Showing posts with label recipe. Show all posts

Wednesday, 26 January 2011

Voluptuous Lettuce


Recipes suitable for:
Main meals for 2
Starters for 4


I love to invent recipes and those lettuce arrangements are irresistable. In case your kids don't like them, pretend that they are only for grown-ups anyway and protect your plate with your life. From those flavours they may come round to it very quickly - well, and wanting to be grown-up might help a bit!

The lettuce is whatever lettuce you like, really. I prefer the stronger nuttier flavours like rocket, lamb lettuce, watercress mixed with spinach leaves, Lollo Rosso or Romaine lettuce. But milder varieties work as well. I only use Extra Virgin Olive Oil and the vinegars are white and red Balsamico. It's all I have. If you have oils and vinegars you prefer - give it a shot. If that's the flavours you like and are used to the dish will adapt.

The amounts of olive oil and vinegar are estimates. Please adjust freely as you go along. For me it depends on the weather and my mood how sour or slippery I like it.
So far the recipe comes in three versions:
Variations:


Pasta & Feta Cheese in Balsamic Dressing

Again, the pasta is whatever you like. I discovered corn pasta recently and love it - and they are of a nice yellow colour. With a stronger lettuce whole wheat pasta are nice, while a standard white flower pasta makes a more subtle dish together with mild lettuce. You even could do it with Ravioli or Tortellini, but be aware of the added calories.

I use dried pasta as I always have them in the house, but of course you can use an equivalent amount of fresh pasta.

fast
15-20 Minutes
easy/versatile


Shopping
  • 2 mugs (150g dry) pasta
  • 250g Feta cheese (from ewes milk)
  • tomatoes
  • lettuce
  • 1 onion (preferably red)
  • fresh Basil (pot on the window sill)
  • 6 tbsp olive oil (or more if you like it)
  • 1-2 tsp flavoured oil otherwise add a bit of pepper and ground coriander
  • 2-3 tbsp red balsamic vinegar (or more if you like it)
Preparation
  • Wash the lettuce and strain well
  • Mix the dressing from oil, vinegar, spices, roughly ripped basil leaves
  • Add the chunkily chopped onion, chopped tomatoes and chopped Feta cheese and stir.


Finish
If you are having it with guests keep the lettuce and mix covered at room temperature until they arrive. If you have to prepare it very early and have to put it into the fridge, get it out at least an hour earlier for it to warm up a bit. Although tomatoes might lose a bit of the flavour in the fridge. Once everybody is there:
  • Put on the kettle for the pasta and add them to the boiling water (use salt only if you really have to)

  • Place the lettuce on a big plate

  • Once the Pasta are ready, strain them and add them hot to the mix and stir in quickly. They are supposed to melt the outside of the Feta cheese a bit.
  • Place in the middle of the salad base and serve.
Enjoy!

Variation
Using just very few tortellini or ravioli per person, this makes a great first course for 4 people. As this type of pasta doesn't mix in very well for warming up the mix you can put it into the Microwave for 1 minute and then stir before gently mixing it with the pasta.
Back to Top


Potato & Shrimp in Sweet Chilli Sauce

I like the baby or Charlotte potatoes, but any potato you like will do. I keep them with the skin but that is not essential, although healthy. I cook potatoes in the microwave. Microwave pot, potatoes and 1/2" (1 cm) water, 6-10 mins highest setting (depending on amount and power). After half the time move them a bit around and test them. The prawns I  usually use are peeled, pre-cooked and frozen. This way I always have some in the house. But you can use any of those sea creatures. There are those thingies with the tails on. You might want to give those a try if you like. They look decorative - are a bit trickyer to eat, though.

Again the topping is a bit luke warm, thus makes it a great starter for guests if you divide the portion by 4.

fast
20-25 Minutes
easy/versatile
Shopping
  • 2 good cups of prawns
  • potatoes (depending on hunger)
  • lettuce
  • 1 onion (preferably red)
  • fresh Basil (pot on the window sill)
  • 1-2 clove of garlic
  • fresh ginger
  • 8 tbs olive oil (or more if you like it)
  • 1-2 tsp flavoured oil (if you have and like)
  • 1/2 tsp ground coriander
  • 2-3 tbsp sweet Chilli sauce
  • lemon juice (bottle to keep in fridge)

Preparation

  • Wash the lettuce and strain well
  • Mix 6 tbsp of oil, the flavoured oil, ground coriander, thinly sliced onion and roughly ripped basil leaves
  • Finely chop the ginger and the garlic and keep them in separate piles
  • Wash the potatoes and prepare them for cooking.
  • Defrost/wash the prawns under cold water and strain well


Finish
If you want to have it for guests keep the lettuce, prawns (fridge), chopped garlic/ginger and the mix covered. When the guests arrive start cooking the potatoes (use hot water when cooking on the hob).
When the potatoes are almost done:
  • Arrange the lettuce into a nest on a big plate.
  • Heat the rest of the oil in a frying pan on medium heat.
  • Add the ginger first stir, then
  • add the garlic and stir.
  • If you like, add a bit of coriander powder and briefly fry,
  • then add the prawns and mix.
  • Reduce heat and stir in the Chilli sauce and
  • add some lemon juice to taste.
  • Quickly half/quarter (depending on size) the potatoes, add to the onion-basol mix and put it into the nest of lettuce.
  • Stir the prawns and put on top of the potatoes.
Enjoy!

Variation 1 - Veggy Version
For a vegetarian version use a yellow and a red pepper and a handful of small broccoli roses instead of the prawns. Do as above, instead of preparing prawns:
  • Remove the seeds of the peppers and slice them.
  • Pre-cook the broccoli in the microwave for a 2 minutes (the moisture from washing is enough to steam them) or steam them until almost done.
  • When the peppers are still a bit crisp add the broccoli and the Chilli sauce. By the time the rest is finished they are done as well.
Version 2 - Potato Salad (veg)
This is a great addition to a BBQ. Leave out the lettuce and the prawn/veggy topping. Just create it as a potato salad adding some broccoli about 3/4 of the amount of potato you are using. Basically basil, onion, broccoli should be about the same volume as the potatoes.
  • Prepare the onion/basil mix as above,
  • add flavoured oil or a bit of chilli powder.
  • Steam/boil potatoes as above.
  • Steam small broccoli roses.
  • Mix it all together still warm.
  • Serve warm or keep at room temperature.
Back to Top


Bulgur & Chicken in Orange Dressing

It's a shame that this one is more time consuming than the others, because it is my favourite. The bulgur is soaked and not cooked, thus it's 'al dente'.

The chicken is best if marinated for a while, the red pepper is best if smoked, and the mushrooms need a bit of attention as well. However this is a brilliant dish for guests as everything can be prepared and final touches are done in a jiffy.

And for vegetarians you just leave the chicken away and give them a bit more mushroom and peppers. If you want to be generous, then steam a few broccoli flowers to put on top.

Needs time
start: 4 hours before
final touches: 15 Minutes


Shopping
  • 2 chicken breasts
  • 1 cup of bulgur
  • lettuce
  • 1 red pepper
  • 250 g mushrooms
  • 1-2 onion (preferably red)
  • 1-2 clove of garlic
  • 1 Orange
  • 5-6 tbsp olive oil
  • 3 tbs white balsamic vinegar
  • 1/2 tsp ground coriander (fresh if available)
  • pepper
  • salt
  • 1 tsp Cajun spice
  • 1 tsp sweet red pepper powder
Preparation

4 - 5 hours before:
  • cover the bulgur in water with a good 1/2" (1cm) water above the bulgur
2 hours before:
  • Mix 3-4 tbsp olive oil with Cajun spice and red pepper powder
  • slice the chicken breast and mix with the marinade
  • keep covered in the fridge
  • prepare the dressing
    • juice of 1 orange
    • 2 tbsp olive oil
    • 3 tbsp white Balsamic vinegar (increase amount to taste)
    • pepper
    • salt
    • ground coriander
    • garlic mashed
  • wash and strain the bulgur carefully and mix with the dressing.
  • keep covered for another 2 hours, stir after 1 hour.
When you have time:
  • Wash the lettuce and strain well
  • Peel the mushrooms. I have a rule of thumb. If the peel of the head comes off easily they get peeled, whether they are closed or not. From the base I cut off a few millimeters. If the base is hollow I remove it. This way I don't have to wash them. Mushrooms take on water very quickly, if you have to wash them do this quick and briefly and strain well.
  • Cut them in thin slices
  • Peel the onion, and
  • slice half of it thinly to get nice crescent shaped slices to decorate the salad leaves
  • the other half cut into chunky bits
  • roast the pepper either over an open flame of the hob (+1 minute of Microwave at the end) or under the grill.
  • take off the black peel carefully
  • remove the seeds and slice it into long stripes (keep at room temperature)
Keep everything covered until you are ready to go.

Finish
15 minutes before:
  • heat a frying pan (dry)
  • put in the chicken slices and fry on full heat until golden
  • switch down the heat to 1/2 power and turn them over
  • prepare a sheet of tin foil, shiny side up

  • Keep an eye on the chicken. It is done when on pressing it down with the back of a fork it feels solid. Take them out of the pan as they get done and wrap them im the tin
  • when the pan is empty add the chopped onions and glaze them, if it burns too much add a bit of water and stir, adjust the heat,
  • add the mushrooms and stir them in
  • stir from time to time

  • Meanwhile:
    • Place the lettuce on the plate and
    • stir the bulgur and place in the middle
    • drape the sliced onion and the smoked pepper strips around it
  • When
    • the mushrooms are done open the chicken parcel at one end and pour the juice into the mushrooms and stir
    • put them on top of the bulgur
    • drape the chicken strips around it

Variation 1 (mild chicken)
Same as above.
Instead of oil and spices mix oil and 2 tbsp of dark soy sauce to marinade the chicken.

Variation 2 (veg version)
Same as above.
Arrange steamed broccoli on top of the plate instead of chicken
If you want to do both versions in one go, take some of the mushrooms out and put it on the veggy plates before you add the juice to from the chicken.

Tuesday, 25 January 2011

Weird Cheesecake

Download PDF
I know this kind of baked cheesecake from Germany, where it was a bit different from the usual recipe what made it very smooth and fresh.

When I came here I couldn't get some of the ingredients so I re-invented it the first time round - what made it very rich and creamy, much to the delight of our friends.

When I was looking for a protein bomb to support our new muscly lifestyle I re-invented it the second time - what made it weird, much to the disappointment of our friends.

Nevertheless, this recipe is very versatile, you can give it a lemon, orange or vanilla twist, you can play with the sweetness and you can play with the kind of fruit you can add. It is high in protein and low in fat (almost 0) and a slice of 1/12 of the whole cake has approx. 100 calories. If you are using sugar instead of sweetener that obviously will go up. I usually go easy on the sweetener/sugar. We prefer to have some maple syrup poured on top if we feel that it is not sweet enough.

protein bomb
low fat
easy/versatile
Duration:1 hour 30 mins
You need:
Cold oven
Blender
Spring form (24cm/9.5'', or any other size)
Tin foil
2 Plates to match the form in size
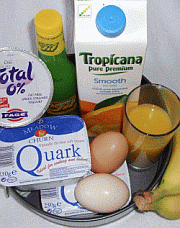
2 Quark 250g (usually in the cheese shelves)
1 Yogurt 150g, fat free strained
2 Bananas, rather ripe

150 ml Orange Juice
4 TBS Lemon Juice (you may vary that)
2 Eggs medium-large
4 TBS Splenda sweetener

If you like:
Morello Cherries from the jar
Fresh or tinned raspberries
Raisins
Natural vanilla extract
Try different kind of juice instead of Orange

If you find the outcome too soggy, that depends on the quality of yogurt and quark and which fruit you are using, then you can add 10g Corn flower the next time.

The stuff you are going to pour into the spring form is liquid and it usually runs through a bit as this cake doesn't have a base.

So take a sheet of tin foil which is bigger than your spring form. Put it on the table with the shiny side looking up, put the spring form on top and then form the tin foil nice and neat around the form so that it sits like in a bowl.

If you want to use fruits (best are actually pre-cooked and strained, fresh tends to have too much juice), place them on the bottom of the spring form.

Now fill the blender with all the stuff. The essentials are Quark, Yogurt, Banana, Egg, Juice. With the rest you can play, although I like it best fresh and lemony. 

Blend for a minute or a bit longer. It's supposed to get a bit of air in so that while baking the cake becomes a bit lighter.

Pop into the cold oven and bake on 140 degrees Celsius (285 Fahrenheit) for a good hour. Depending on how quickly your oven heats up. The cake should start to become a bit brown on the top, but only a bit. The picture above is a rather pale one, but my oven doesn't bake evenly. I have to stop it when 1 quarter becomes too dark. 

When finished leave it for a few minutes with the door half open and then carefully loosen the cake from the rim of the form and then let cool for a bit so that you can touch the form without mittens. 

Remove rim of the form and place one plate upside down on the cake. Now turn the whole thing over. Be careful there might be a bit of liquid accumulating (hence the pre-cooked fruit), remove the bottom of the form, place the second plate upside down on the cake, so that the cake is between the two plates now. Turn it back without pressing the cake too much. Now remove the top plate and the cake sits nicely the right way round on the plate that you put on second.

Let cool, and enjoy plain, with maple syrup, or whatever else you want to try it. I prefer it at room temperature so I usually pop my slice into the microwave for a few seconds, but that's your choice.

Keeps in the fridge for several days.

Friday, 3 December 2010

Sudorific Chicken Soup


Variation from the Telly

Recipe suitable for:
7 portions
Preparation:
1 hour

Simmering:
2 hours

Calories per bowl 750ml:
400

Shopping
  • 1 whole chicken or
    8-9 chicken pieces (thigh/drumstick)
  • 3 pack = 350-400g Shitake mushrooms
  • 6 medium - big onions
  • 2-3 leek
  • 2 decent thumbs of ginger
  • 2-3 medium hot chilli pods
  • chicken stock (cubes)
  • 2l water
later
  • 1 whole garlic
  • 150g Goji Berries
separately
  • rice

You may want to adjust the amount of ginger and the chilli. The above gives a decent to hot heat. If you don't like hot food then take most of the chilli seeds out. 

This is a very simple to cook dish which can be kept in the fridge for several days and heats up in the microwave very well. We usually have it for 3 days with 2 people.
Take a big pot (6l or so) and chop:

All that should nicely help against coughs and colds!


  • the mushrooms,
  • the leek,
  • the ginger,
  • the onions,
  • the leek
  • and the chilli.
I finish with the chilli because I want to avoid touching anything that has chilli on it. This way I don't have to clean the chopping board inbetween.

There are no rules regarding the shape, but I like things stripy. So I chop everything lengthwise. For the chillies I use fork and a kitchen knife. Some disposable rubber gloves are a good helper as well - and be careful that no seeds jump on the floor when you have kids or pets around.

To prepare the leeks chopp of the bottom bit to get rid of stalky root bits.

Then remove the outer layer.

To get rid of the dark green leaves, slice round the neck where the outer dark green leaves open. The darker the tougher the material and the very dark bits need removing without losing the brighter bits.

From the inner brighter green leaves chust chop off the tip.

Then slice the whole stem lengthwise starting from the bottom and hold it neatly together at the bottom bit.

Rinse under the tap using the other hand fluffing only the green tips to get the soil out.
If it has a stalky middle bit take it out while trying to keep the layers in position.

Dry gently on a kitchen towel.

Slice into half rings.

Then add 2 litres of water and the chicken stock as advised for the 2l on the packaging, but stay a bit on the lesser side. I prefer to add some liquid concetrated stock to the finished soup as needed.

Rinse the chicken and add to the pot. It will add some flavour and thus it is better to not overwhelm it with stock granules at the beginning. 


Heat the soup to boil and then let simmer for 2 hours

Soak the berries, they will be soft by the time the soup is finished

Start preparing the rice so that it will be finished by the time the soup is done.

10 minutes before the soup is done take a whole garlic, peel and finely chop.

When the soup is done take it off the heat
  • fish out the chicken,
  • add the berries including the water,
  • the garlic
  • and chicken stock (concentrate or granules) to taste
Get the meat of the bone, cut to bite size pieces and put it back into the soup.

Stir.

Then very briefly heat the soup up again, put into bowls, add some rice and...

Enjoy!

_________________________
PS: found another blog about Chicken Soup and the author found another source of proof for the medicinal use of chicken soup. Ha!

Sunday, 7 November 2010

Flavoured Olive Oil

Take a fresh bottle of olive oil and add
  • about 8 cloves of garlic (halved)
  • 1-3 chilli pods depending on size and heat

if you like

  • a teaspoon of coriander seeds
  • a teaspoon of pepper seeds
  • and whatever else spices you might fancy

After 2 weeks the oil tastes nice and flavoured. It may develop a bit of gas what is not a problem. Although it is not good for frying anymore as it gathers water as well. Just use it as a flavouring towards the end.

The longer you have it the more you might need to be careful to dose it.

I use a dispenser for shots. Less dangerous for overdosing and keeps the bits away from the dressing.


Stunningly Salacious Butternut Squash

For Two

Butternut squash is my favourite winter squash. As opposed to summer squash like courgette and marrow they have a harder skin which is usually not eaten. Our beloved pumpkin is a winter squash as well.

And well, a lot of people don't like them that much - at least for consumption - which may lie in the fact that they often get pickled or made into rather mild dishes which brings out the sweetness of the vegetable.

My stunningly salacious butternut squash is a spicy enterprise which turns the flesh of the squash into a nutty flavoured mashed potato consistency topped with ... well, that is the trick:


Download PDF

Everything you like, really!

However, here is my favourite version! I like it as main course and then I prefer medium sized squash to get a reasonably big hole into them for the filling, but as a side dish two small halves each person are alright.

It is a good dish for party invitations as it can be prepared and kept in the fridge. Only pop it into the oven an hour before the guests arrive. That gives you a lot of freedom to get the other preparations done.

As for the chillies: You can use chilli powder, but that will just make it hot. With putting in the effort to use fresh hot chillies of a bit fleshier variety you will get a wonderful aroma and only very little heat.

You need:

Preheated oven 160 C (320F)
Baking tray

3 medium or 4 small butternut squash
250g Feta cheese (from ewes milk)
1 onion
2 chillies
olive oil
ground cheddar

Spices:
t tsp roasted sesame seed
2 tsp dried basil
1 1/2 tsp coriander powder
1/2 tsp turmeric
1/2 tsp kalonji (black onion seed)
1/2 tsp black ground pepper

If you like it hot: a bit of chilli powder or spiced olive oil


Good for parties
Side or main dish
Preparation: 1/2 hour
Baking: 1 hour

Preparing the Filling

Pour a good pool of Olive Oil - well, that is the only sinful thing in this recipe - and mix in the spices.


Everything needs to be rather finely chopped, otherwise it's hard to get the squashes filled.

Peel and half the onions, hold the half tight, slice one direction and then the other. I like red onion, but any other will do as well.


For Feta I use the prepackaged which is always a bit slippery when it comes out of the foil. So I give it a brief rinse under cold water, dry it with a bit of kitchen roll and then cut small cubes. I use a cheese knife - bless the inventor. Any cheese is cut so easily without sticking to the knife.

Now the task of chopping the chillies. I got rather skilled using fork and knife. Otherwise definitely use gloves (best are the silicon ones usually used for DIY). And if you have kids or pets be careful not to have the seeds popping around.

Since I am only after the aroma and not the heat I remove every single seed. As long as the flesh is uncooked they are burning hot, but after being cooked for an hour all the heat will be gone. At least from the stuff that you can buy from the supermarkets.

Only on year I had home-grown ones which can burn holes into tables. I use them for the spiced oil now.

So finely chop the chillies to get the flavour evenly distributed in the mix.


Now the squashes get washed, dried, chopped the stalk off, halved, de-seeded and then a bit carved to make the hole bigger for the filling.


The leftover fleshy bits - not the seeds - get finely chopped and mixed in with the Feta and the spices. Some people use the seeds as well, but I don't like them, so I leave them out.

Pop the filled squashes on a baking tray - no need to grease the tray - and grind a bit of cheddar on top.

Off they go into the preheated oven and an hour later there they are:


Stunningly Salacious Butternut Squash

And as I said: They can be filled with anything. I could imagine that sweet pepper powder, a bit of ground cumin, cumin seeds, mustard seed, oregano, nutmeg, fennel seed would work nicely, depending on what the rest of your filling is.

Leek, carrot, broccoli. peppers, tomatoes are an option and I could even imagine a mince meat - veggie mix, or parmesan instead of cheddar.

And test your oven! I have a fan oven and 160C is perfect for medium sized squash. More and the cheese would burn, less and the squash would not be done. If you are unsure, have them without cheese sprinkle for the first half hour, then add it and observe. You can always turn up the heat for a bit towards the end to brown the cheese.

If everything fails and the squashes are not done while the cheese is getting dark already, pop them on a microwavable plate and finish them off in the microwave. Them put them back into the oven for another few minutes to make them crisp again.

Be adventurous and enjoy!